Last week, my fiancée and I moved into a new apartment in New York. Our very first NYC apartment a few years back had an old school buzzer that would ring in the apartment and had the little device on the wall that let us open the door from upstairs. Our second and most recent apartment was more modern - it had a ButterflyMX system which sent a push notification to our phone whenever anyone buzzed us - much nicer!
Our new apartment, though, is stuck in the messy middle. It has one of those “press a button and we’ll call the tenant’s phone” systems. When you get the phone call from the automated system, you press the “0” key and it opens the door.
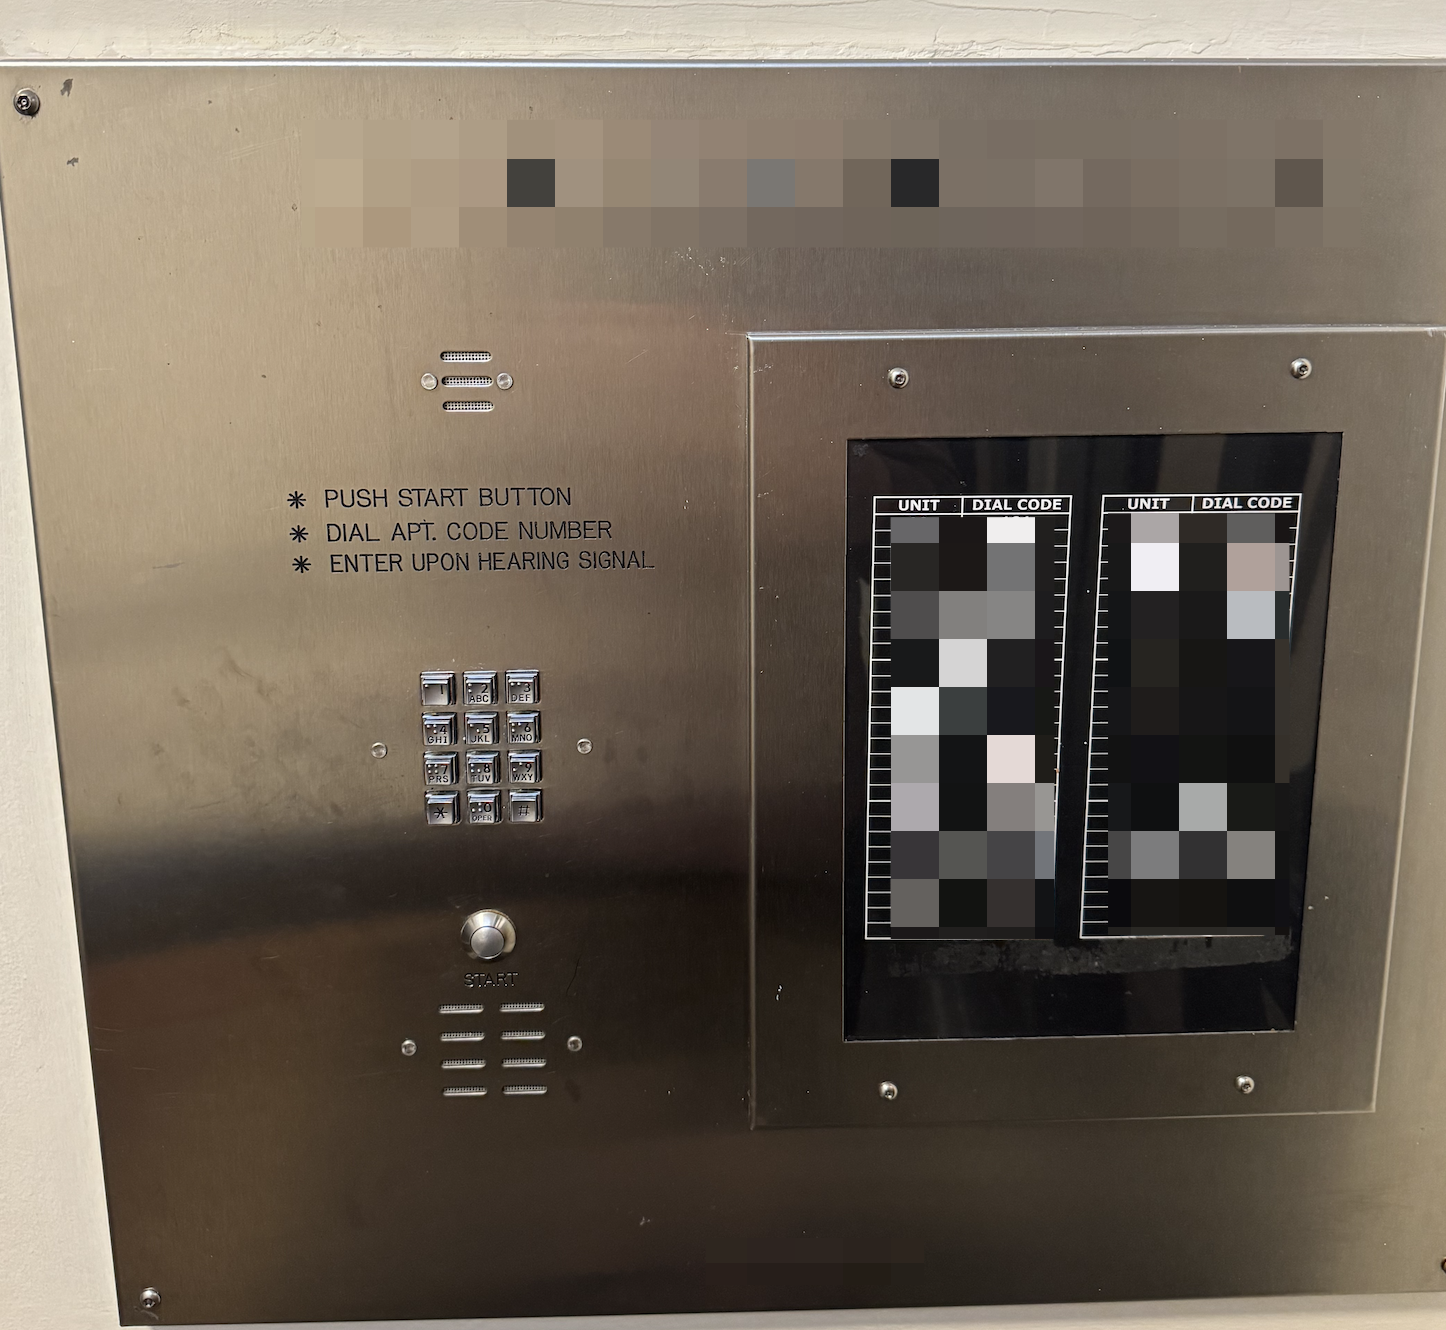
I have friends who have these systems, but it never truly struck me just how inconvenient they are until the building manager begrudgingly informed me that, no, he cannot put more than one more phone number into the system, and no, I am not the first to ask. 🤔
This bummed me out. I travel relatively frequently and my fiancée works from an office. We have package deliveries, dog walkers, etc - this setup was going to make it difficult for us to open the door without depending on only one person who could be added to the system (originally, me).
Time to hack something together! (“Gently modifying” might be a better description - there’s nothing nefarious involved here 😅)
An API?
The first thing I did was look for an API or any kind of public interface from the buzzer’s manufacturer. The system was built by Citywide Solutions, which appears to be some kind of bespoke security company. Not only is there no developer interface, they don’t even list the specific intercom model for my building.
Not a terribly surprising outcome, but worth a shot. Time to build something myself!
Project requirements
I have been known to go down rabbit holes on side projects, so I held myself to a tight list of requirements:
- The interface (app/website/whatever) should allow us to switch the phone number that the intercom dials, automatically reject a buzzer request, or automatically accept a buzzer request
- Spend little money (<$100)
- No fancy/overly clever infrastructure - it needs to just work and not require maintenance or effort beyond the original dev work (a good heuristic - if I found myself provisioning Kubernetes, something was wrong 🫠)
- Disturb the apartment complex/building manager as little as possible. No need to raise any concerns as a brand new tenant 🙃
- Quick to build so that I could expeditiously return to helping unpack the apartment
With all of these requirements in place, I figured that the simplest interface for interacting with the intercom itself would be to replace the single static phone number in the system with a Twilio inbound phone number that I could then program. I (very) briefly considered building a tiny device that could physically interact with the buttons, but that was deeply in conflict with #4 - not sure the building manager would have enjoyed that little experiment 😅. Twilio it is!
Setting up Twilio
I’ve used Twilio in the past to send text messages but have never used their inbound calling services. I actually found it easier than the SMS features, mainly because purely inbound features required no compliance work.
I started by buying the cheapest phone number available for ~$1/month. Not bad. Twilio makes it super easy to configure what happens when someone calls that number:

I started going down the “Functions” path which is code driven but got distracted by the “Studio” product - although writing code would have been fun, I was trying to get this done quickly and the Studio is basically a no-code interface for programming the phone number. Perfect for this project!
Having never worked with incoming phone calls, I wanted to first test if I could simply get the Twilio number to press “0” when it received a call. Turns out, this was actually super easy:
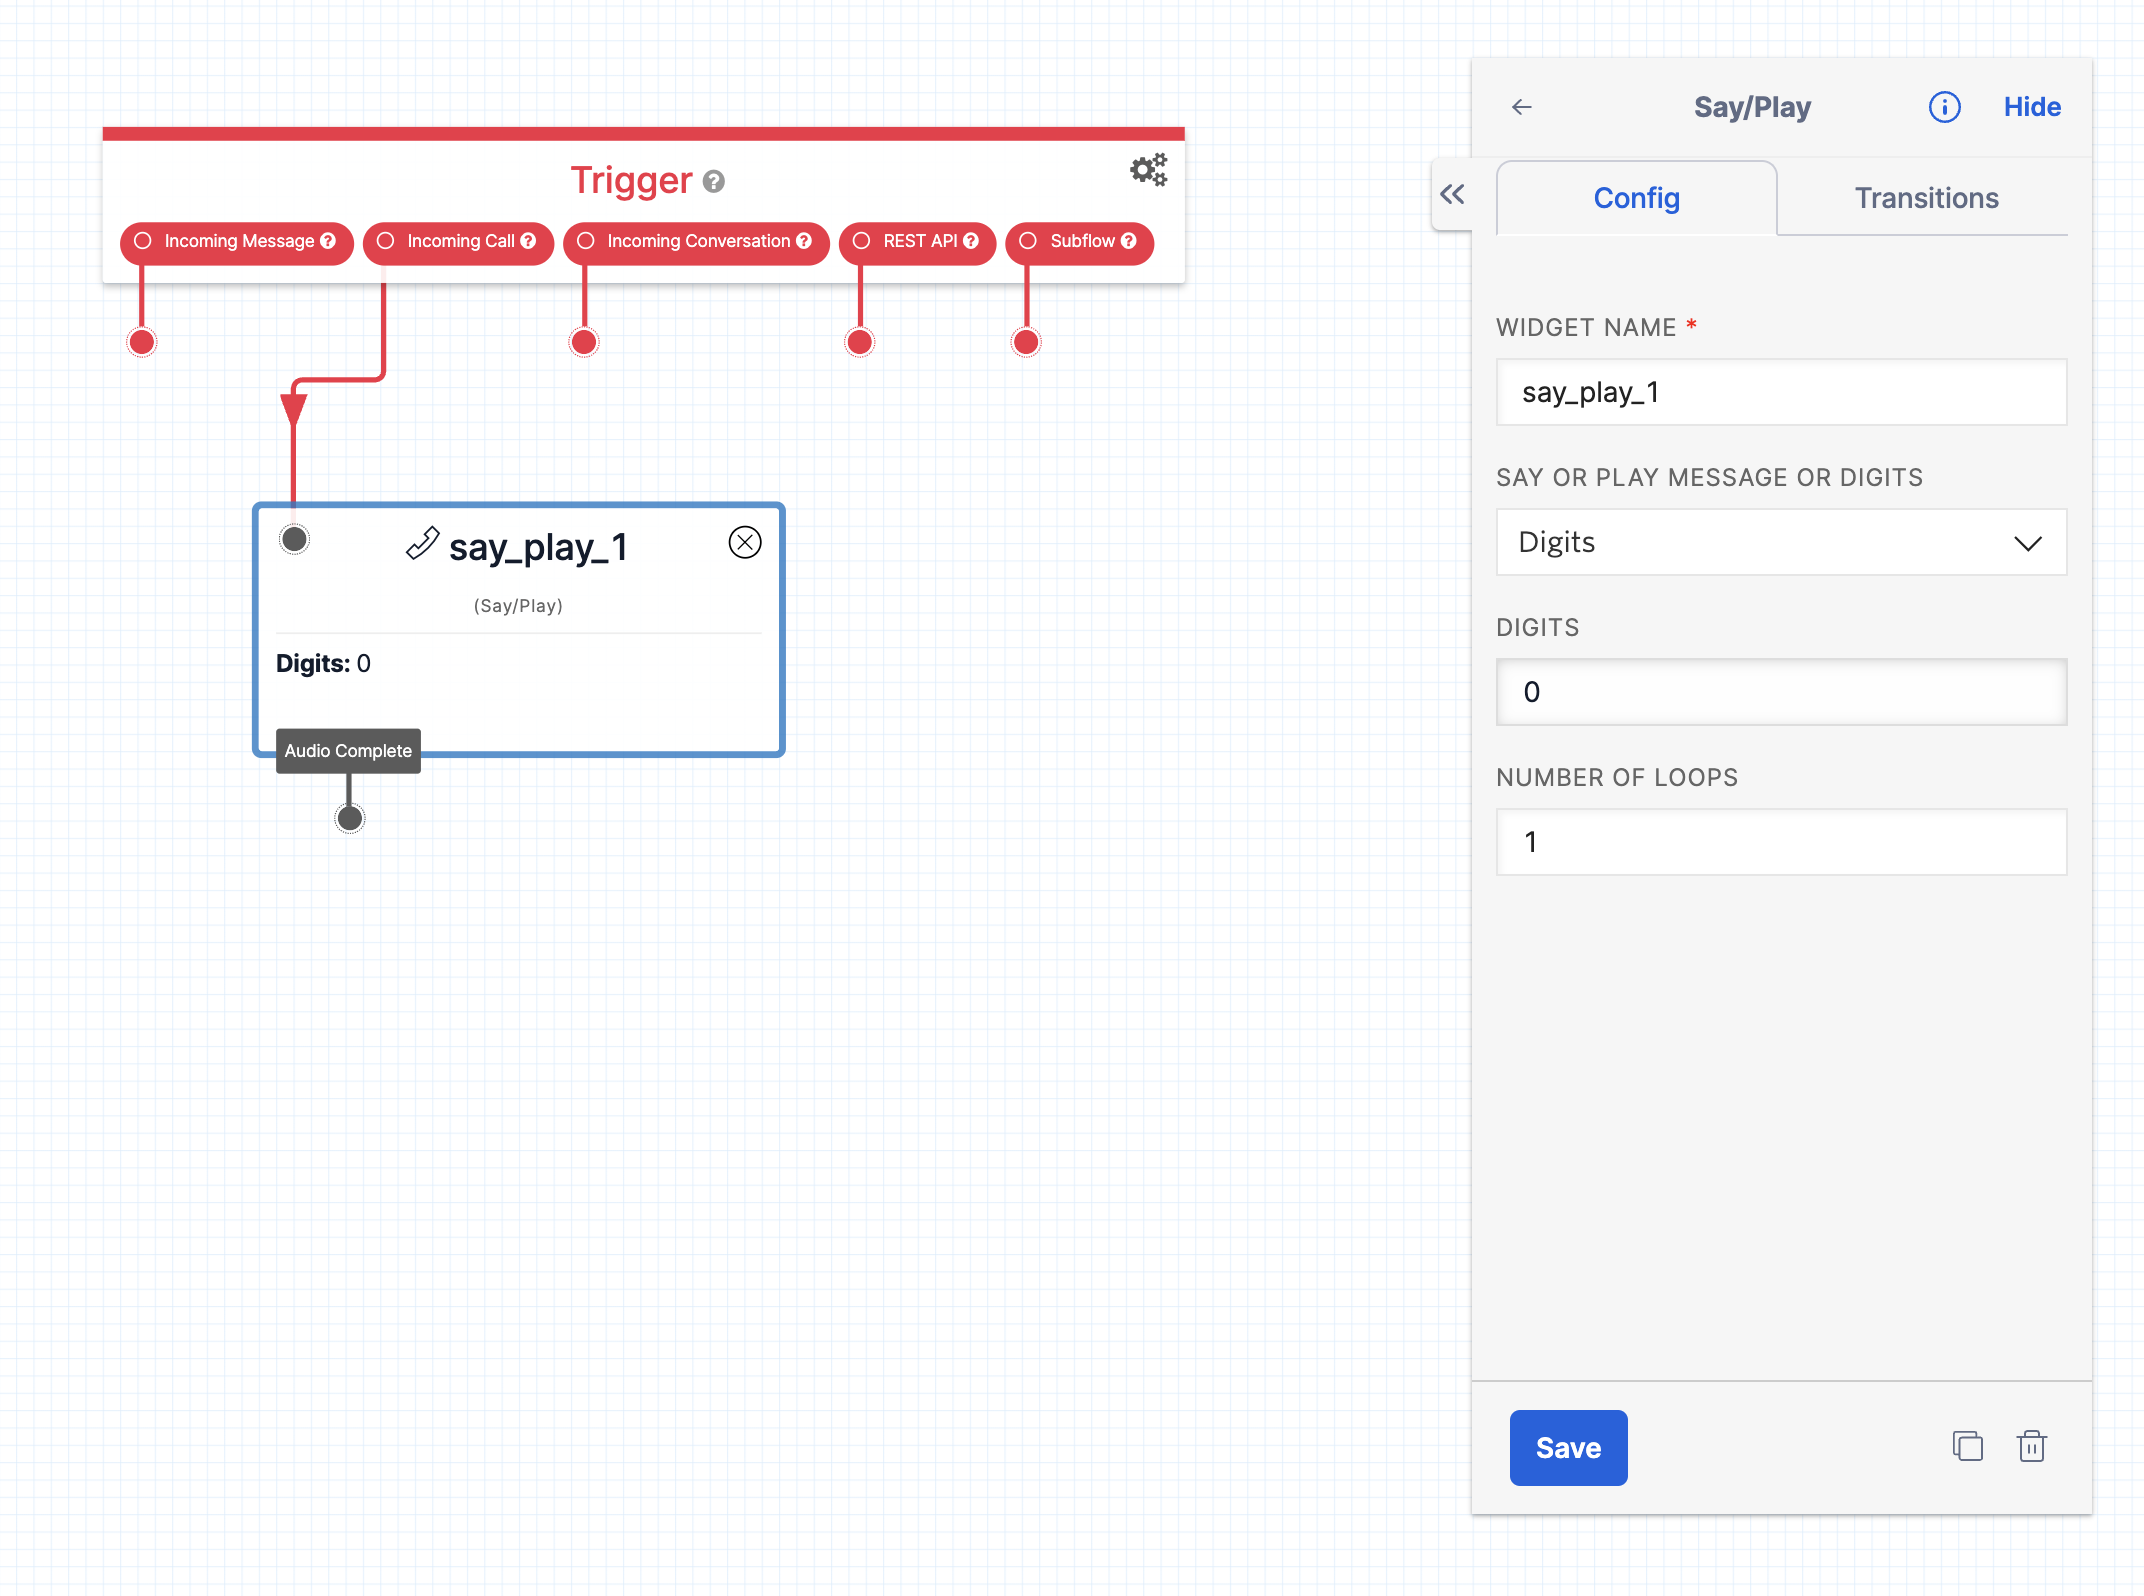
I knew that I would need some additional functionality in a little bit, but this was enough to get me excited. Time to figure out how I would interact with this new system!
Idea 1: Build an app with push notifications
My first idea was an iOS app (I’m a Swift developer at heart) that would send a push notification when someone was downstairs which could then be accepted/rejected. Basically, a clone of the functionality that we had with our ButterflyMX system. This introduced some complexity, though. In order to make this work, the Twilio Studio flow would need to send the push notification and then wait/poll for a response to accept or reject the visitor. I may have missed something, but a very cursory documentation glance led me to believe that there was no async method of posting data back to the Studio flow, which makes sense given the synchronous nature of a phone call. Onto idea #2!
Idea 2: Build a website to set the status
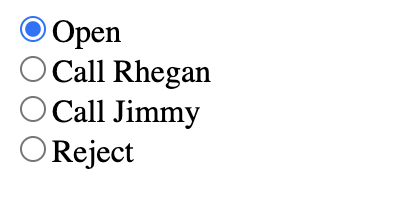
The second idea was to build a simple website that would allow my fiancée and I to set the current status of the buzzer (open, call Jimmy, call Rhegan, or reject). It wouldn’t provide the satisfaction of a real-time push notification, but if we wanted to be notified of a visitor we could set it to one of the “call” options and interact with the call like we would if it was still one of our personal numbers hardcoded into the intercom.
With the interface method selected, it was time to figure out the simplest way to build this system.
Choosing a host
I knew right off the bat that the system would need two parts:
- An API that returned the current status of the buzzer. This would be read by the frontend interface as well as the Twilio Studio flow to determine what action to take.
- A frontend interface for us to interact with.
The “full stack engineer” part of my brain said “spin up psql and a simple backend and host it on fly.io” but the time-pressured part of my brain said “that’s overly complicated.” Really all I needed here was a stateful storage mechanism that would return a single status value. It didn’t even matter if that value was stored in memory - it just needed to be persistent long enough for Twilio to read it and react.
I’m a big Cloudflare fan but had not yet had a chance to check out their Workers and KV products. Although this was far from a project that needs the actual scaling/edge benefits of those products, it felt like a simple enough stack to satisfy my needs.
Writing the status API
I started with the status API. Cloudflare organizes their key-value stores into “namespaces” which are just logical groupings of keys and values:

Once the namespace is created, you can add arbitrary keys and values. In my case, I only needed one to hold the current buzzer status:
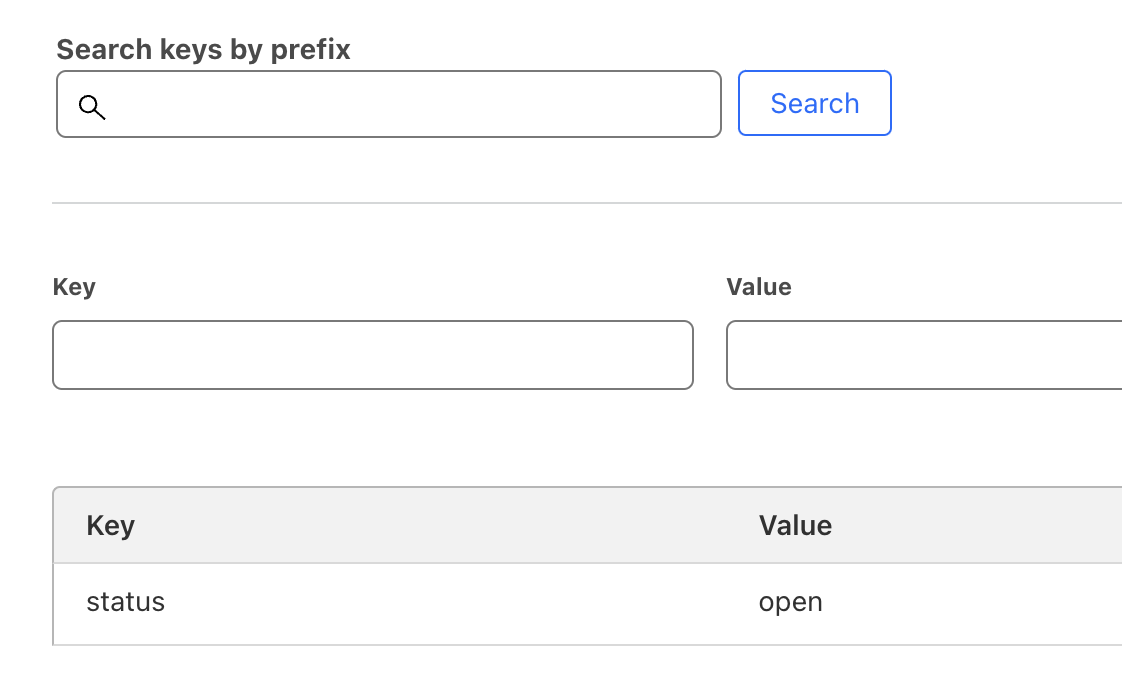
Next up was the Workers code, which simply needed to return a JSON payload with the current status. (I originally thought I’d need this worker to have a route to update the status as well, but that ended up being unnecessary. More on that below!)
export default {
  async fetch(request, env, ctx) {
    const statusValue = await env.status.get("status");
    return Response.json({status: statusValue || "reject"});
  },
};
I didn’t even bother setting up a local repository for this, I just used Cloudflare’s web editor to write this. Super simple setup and now I have a (free) host for the API.
Building the website with Remix
Next up, it was time to build the interface for us to update the status. My original idea was to write another Workers function that would allow a caller to update the status through a POST request and then build a simple plain HTML frontend with a form.
Recently, though, I’ve been really interested in Remix. It reminds me of the PHP-based web stack I grew up with mixed with all of the nice features of modern JavaScript/React. I probably would have stuck with my HTML frontend if not for the fact that Remix has first-class Cloudflare Workers support and I wanted to further my exploration with the framework 🙃
I won’t enumerate all of the setup steps here (the Remix and Cloudflare guides are good), but here’s what the only meaningful file in the project ended up looking like:
import type { LoaderFunction, ActionFunction } from "@remix-run/cloudflare";
import {
  useLoaderData,
  useActionData,
  Form,
  useNavigation,
} from "@remix-run/react";

interface Env {
  status: KVNamespace;
}

export const loader: LoaderFunction = async ({ context }) => {
  const env = context.env as Env;
  const statusValue = (await env.status.get<string>("status")) || "reject";
  return statusValue;
};

export const action: ActionFunction = async ({ request, context }) => {
  const formData = await request.formData();
  const status = formData.get("status");

  if (typeof status !== "string") {
    return { errorMessage: "Invalid status", status: 400 };
  }

  const env = context.env as Env;
  await env.status.put("status", status);

  return { successMessage: "Status updated", status: 200 };
};

export default function Index() {
  const status = useLoaderData() as string;
  const actionData = useActionData() as {
    successMessage?: string;
    errorMessage?: string;
    status?: number;
  };
  const navigation = useNavigation();
  const isSubmitting = navigation.state !== "idle";

  return (
    <>
      <Form method="post" action="/?index">
        <div>
          <input
            type="radio"
            id="open"
            name="status"
            value="open"
            defaultChecked={status === "open"}
          />
          <label htmlFor="open">Open</label>
        </div>
        <div>
          <input
            type="radio"
            id="rhegan"
            name="status"
            value="rhegan"
            defaultChecked={status === "rhegan"}
          />
          <label htmlFor="rhegan">Call Rhegan</label>
        </div>
        <div>
          <input
            type="radio"
            id="jimmy"
            name="status"
            value="jimmy"
            defaultChecked={status === "jimmy"}
          />
          <label htmlFor="jimmy">Call Jimmy</label>
        </div>
        <div>
          <input
            type="radio"
            id="reject"
            name="status"
            value="reject"
            defaultChecked={status === "reject"}
          />
          <label htmlFor="reject">Reject</label>
        </div>
        <br />
        <br />
        <button disabled={isSubmitting} type="submit">
          Update
        </button>
      </Form>
      {actionData?.successMessage && (
        <p style=>{actionData.successMessage}</p>
      )}
      {actionData?.errorMessage && (
        <p style=>{actionData.errorMessage}</p>
      )}
    </>
  );
}
The key lines here are:
// Get the status from Cloudflare's KV
await env.status.get<string>("status")

// Set the new status in Cloudflare KV
await env.status.put("status", status);
This was super nice because aside from adjusting the imports and a few environment variables this was no different than the other Remix projects I’ve experimented with. The end website looks very simple, but works perfectly. Updating the selection on the website changes the KV status value which changes the API endpoint response:
Adjusting the Twilio flow
With the backend and frontend infrastructure in place, the only thing left to do was to adjust the Twilio Studio flow to read the status and take the appropriate action.
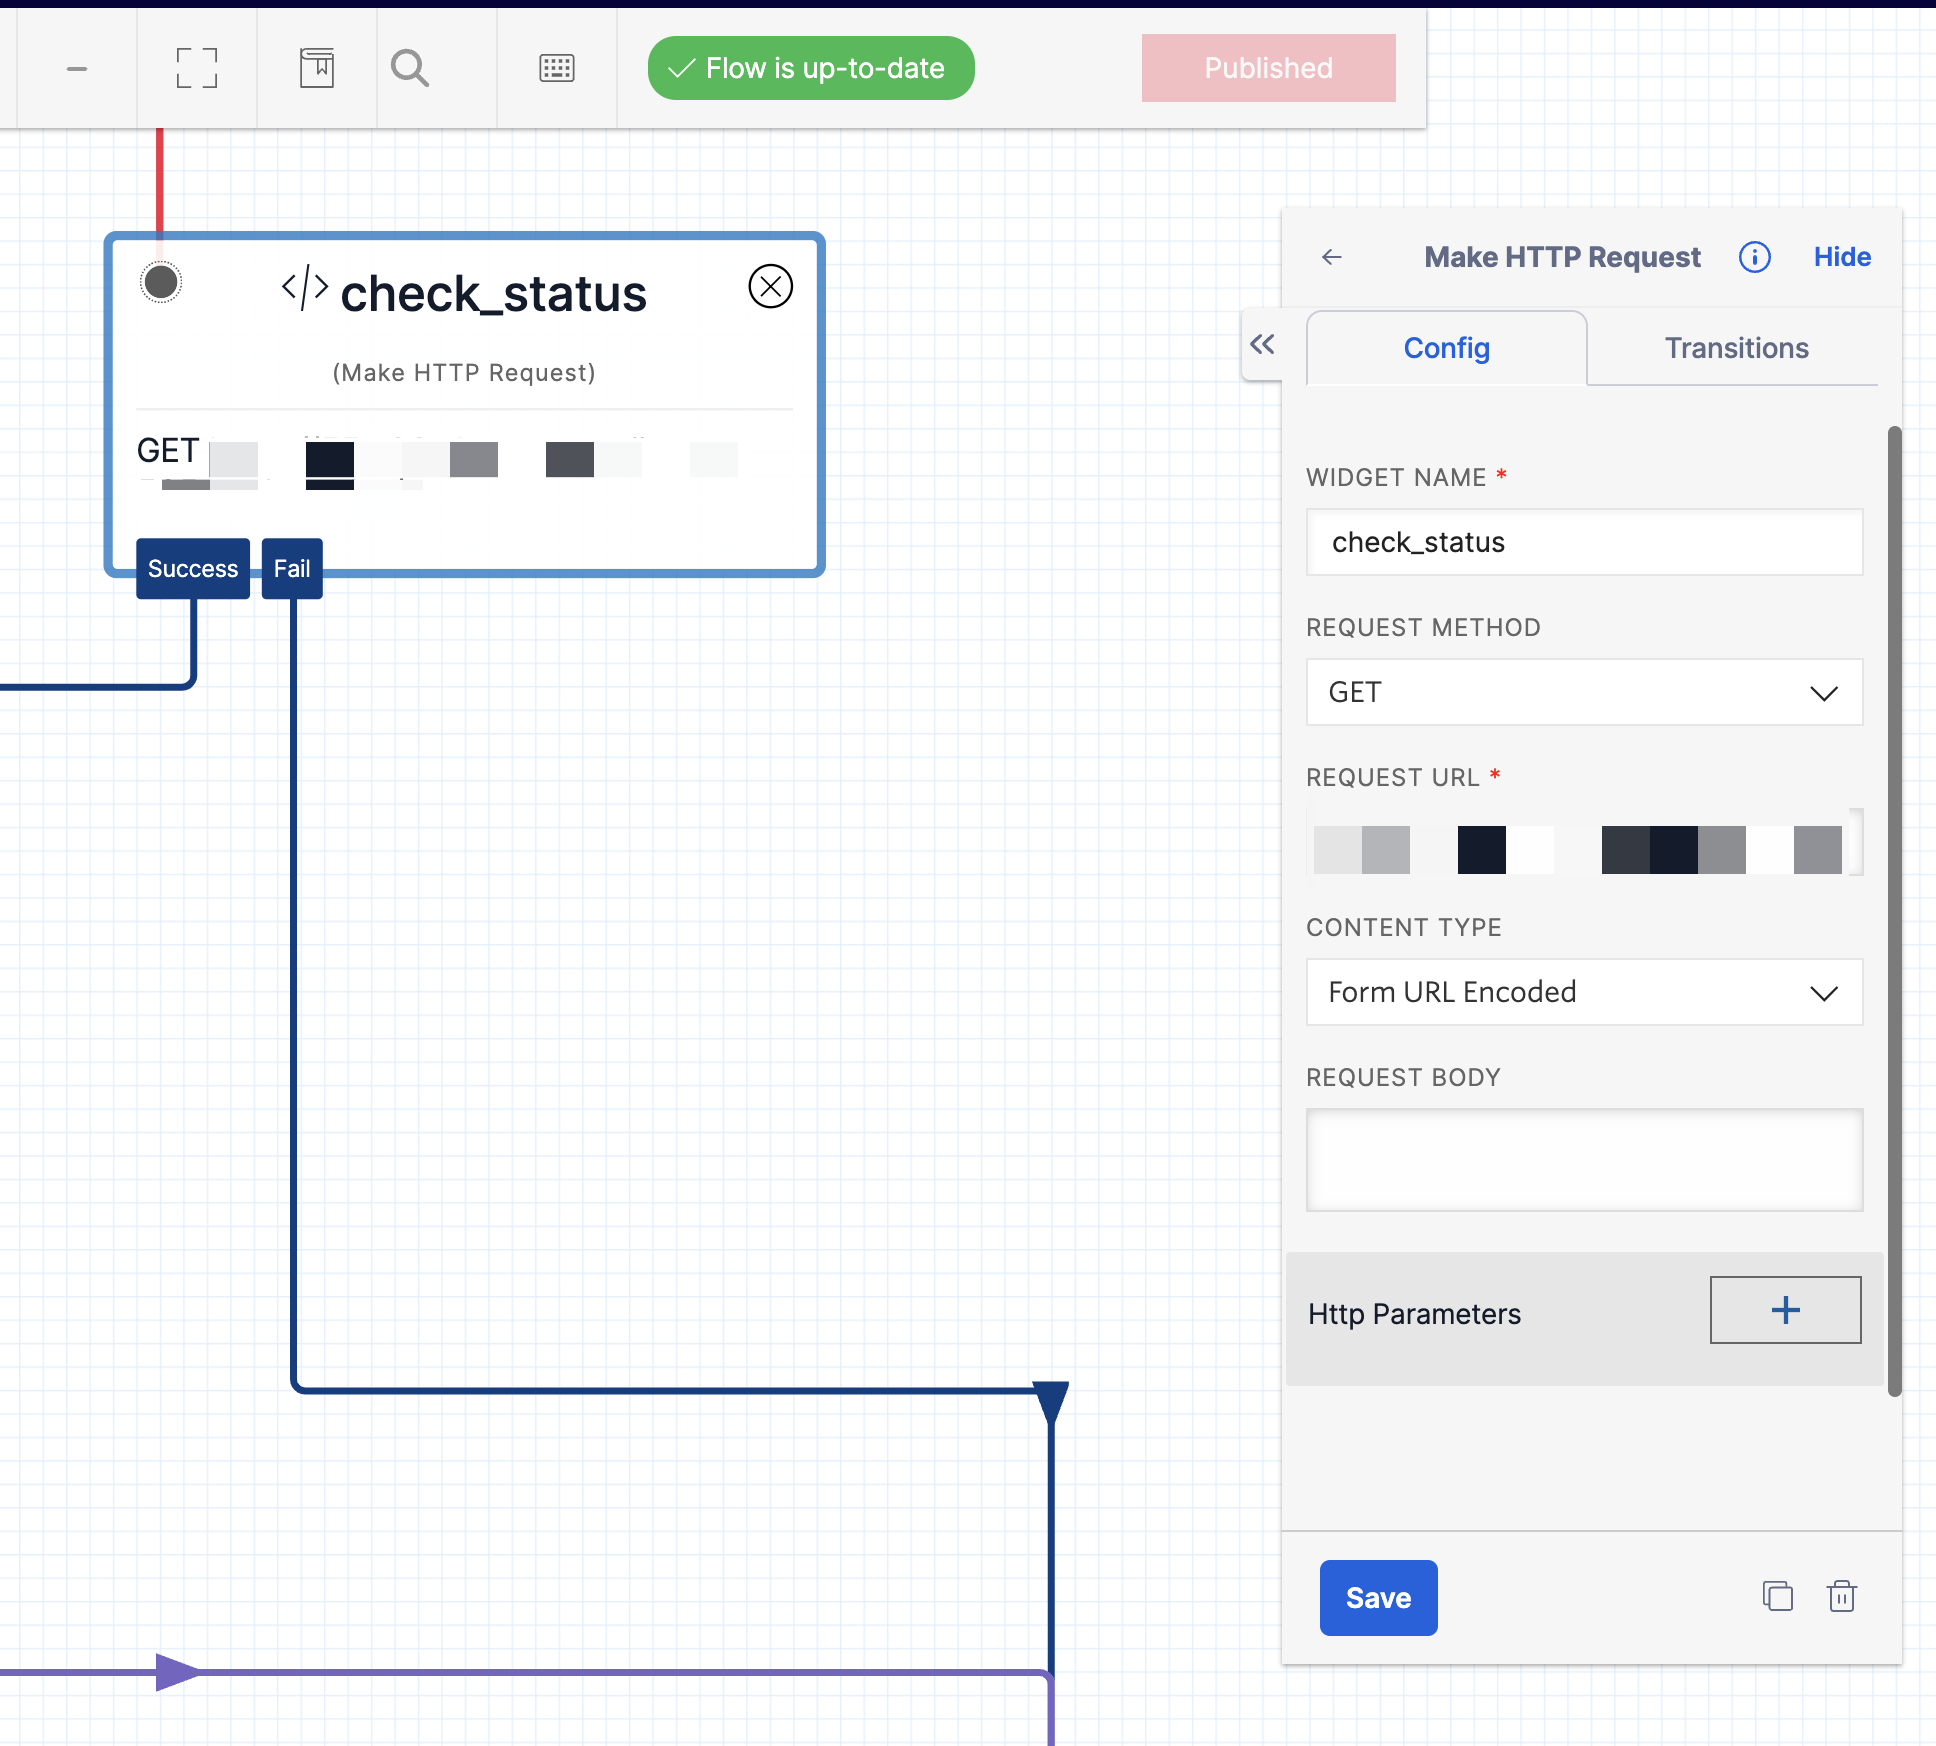
Twilio has an HTTP action that makes it easy to call an API:
From there, we use the “Split Based On” widget to conditionally direct the flow to a further widget depending on the result of the API call:
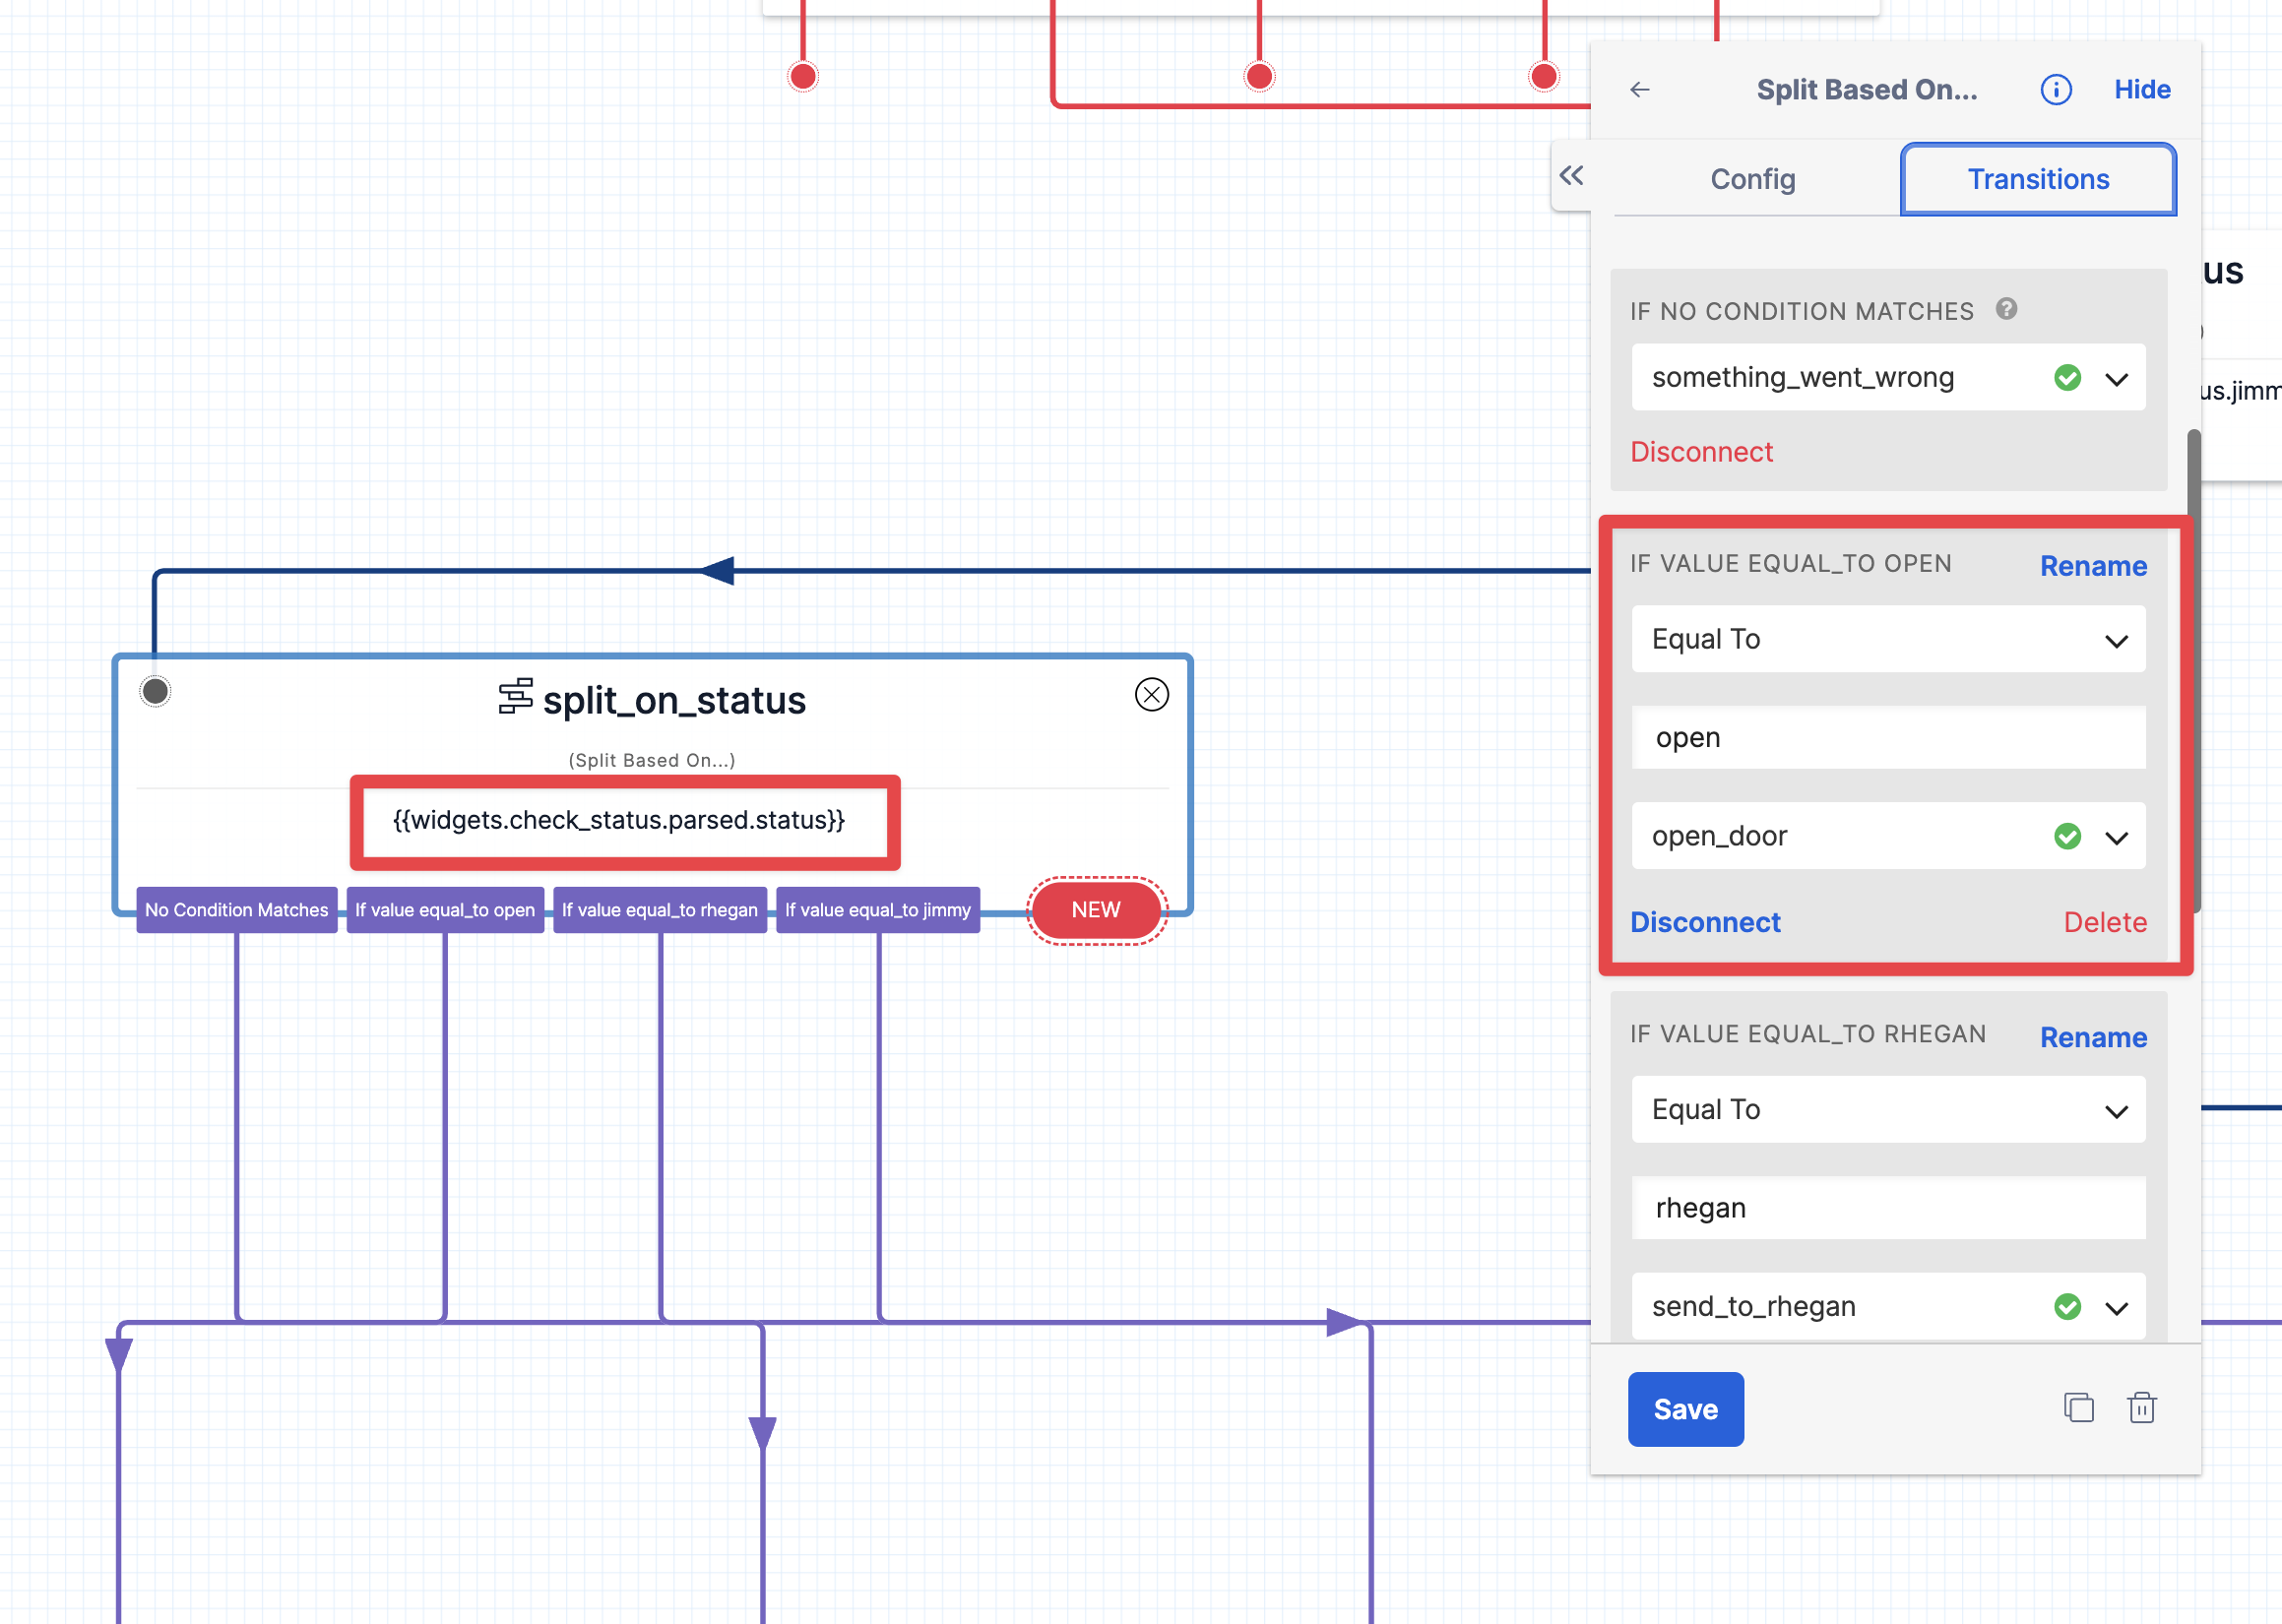
Finally, I have a set of actions depending on what the current status is set to:

The end result is that:
- If the status is set to “open” then the system immediately dials “0” and hangs up
- If the status is set to “jimmy” then the system forwards the call to my number
- If the status is set to “rhegan” then the system forwards the call to Rhegan’s number
- If there’s an error or the status is set to “reject” then the system ends the call
The “open” status works particularly well - the door unlocks nearly immediately when set to this option.
A note on security
It’s worth calling out that the “open” option isn’t particularly secure. We plan to use it sparingly, like when we know we’ll both be in meetings when a package is going to be delivered and the delivery person knows our unit number. Otherwise we have the system set to call one of us depending on what works well for that day.
Final configuration
The last step in the project was to have the building manager update the phone number to the new Twilio number. Once that was done, we tested all four options and they worked perfectly. All in, the project took about 2 hours of experimentation and far less than $100, so mission accomplished 😎